Welding images in Cricut means joining several layers together to create one image. Weld cannot be undone so be careful how you use it. There are other ways to join your image, and we’ll have a look at the options available so you understand how each of them works.

Cricut Design Space
Cricut has its own image editing software called Design Space, and this has many features to help you create and cut your images.
Design Space is a cloud based app and is free when you purchase your Cricut machine. It is also free to use if you create your own designs. Subscriptions are available if you want to use their images and ready made templates. You will need to create an account to use it, but it allows you to store your files in the cloud and use your Cricut machine to print or cut your images.
The app has many useful tools, as you would expect with good image editing software, and you can log in from any phone or tablet where ever you are.
With Design Space you can:
- View a library of over 50,000 images, fonts and ready made projects.
- Upload your own images to edit or cut them.
- Connect wirelessly to your cutter.
- Create a whole feast of items from greetings cards and party items to scrapbook and fashion designs.
As most designers know, working with layers is sometimes the best way to build up your design. When it comes to printing or cutting your designs, it’s important to merge them together to be able to hide all cutting marks. Reverse printing can also prove to be a problem if your layers are not joined together.
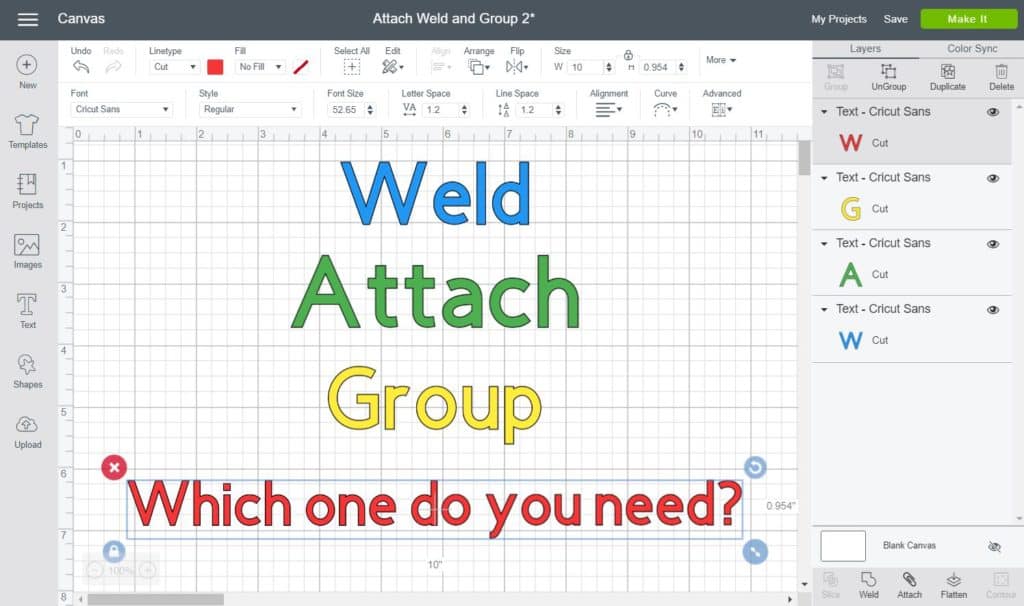
Cricut Design Spaces has 3 tools for joining layers: Attach, Group and Weld.
Free Download: 5 premium T-shirt designs from Tee.design
Source: https://daydreamintoreality.com/weld-attach-group-cricut/
Weld
Weld is the permanent option of the 3 tools and should only be used if you are confident that your image will not need editing in the future. It will merge your layers in to one and once merged, the layers cannot be separated back out.
If some layers are overlapping each other, weld can also be used to tidy up the image and remove these overlaps.
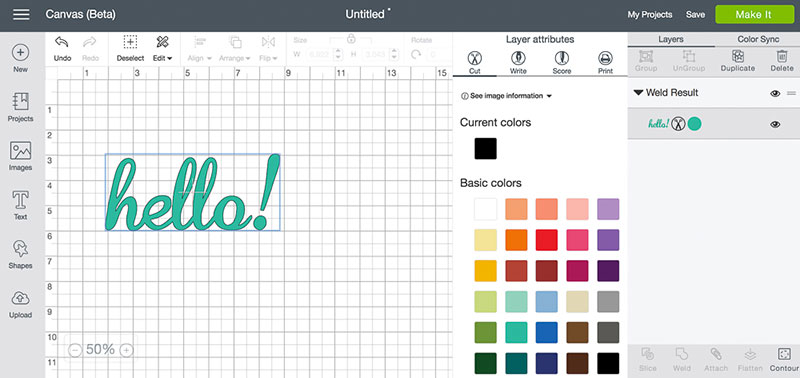
How To Use Weld
You first need to be in Cricut Design Space.
- Select all the layers you wish to weld. Hold down the CTRL key and then click on each layer you want to weld.
- When you are sure you have everything selected, click on the Weld tool. The Weld tool is located in the Cricut Canvas area, at the bottom of the layers panel.
Your image has now been merged ready for you to cut or print.
If you don’t want to merge your image together permanently, then you should use Attach or Group. Both of these actions can be undone.
How To Unweld In Cricut
It is NOT possible to unweld in Cricut, this is very important to note before you weld shapes or text together (I realise this may be too late for some of you, so sorry for that).
Before you weld together, you need to be 100% sure you’re happy to proceed and everything is in the right position.
Don’t forget you’ve got the magic undo button should you need it, you can undo any action immediately after.
Here’s a useful video on welding and unwelding from Daily Dose of Diy
Attach
The Attach tool holds your layers in place when you move them to the cutting mat. Cricut has a habit of moving layers when you go to save and this can spoil your design. Attaching them will hold them together so that you can print or cut them as you want them.
When you are finished, you can unattach them so you still have your original layers to work on.
How To Use Attach
- Create your design in Cricut Design Space
- When everything is placed exactly how you want it, hold and drag your mouse over all the layers.
- Use the Attach tool which is in the bottom left.
Attach can also be used to score lines in your design.
You can now move your project to the cutting mat and it will appear exactly how you planned. If you want to alter the color or position of any of the layers, you will need to unattach them and then attach again.
Group
The Group tool is another way to merge layers together, but it works slightly differently to Attach. You group your layers together but you can still alter the color, rotation or position of the grouped items.
How To Use Group
- Create your design in Cricut Design Space
- Hold your mouse and drag it over the layers you want to group. Alternatively hold down the CTRL key and click on them.
- When you have them selected, click on the group tool which is at the top of the layers panel.
- Your layers are now grouped together.
If you want to continue working on individual layers, you can simply ungroup them.
100% free download: 5 premium T-shirt designs from Tee.design
To Finish Up
Using these three tools wisely will help you get the best but for all your designs. You may find you favor one tool over the other two, but all of them will help you cut your design just how you want it. It may take a few attempts to get it right, but Cricut does make it easy for you to connect and print.