When working on your design in Cricut, you may have come across an error message telling you to “remove exclusive content.”
You can fix this error by logging out, clearing your browser history or using a different browser. If you’re using Cricut Access, you have to either renew your subscription or remove all exclusive images and fonts.
If you’re seeing this error message, don’t panic. Here’s what you need to do to fix the Cricut remove exclusive content error and return to your designing.
Need new premium T-shirt designs? Get 5 for free from Tee.design
Uploaded Images
There are two main situations that can cause you to come across this error message. The first one involves using uploaded images on the website. Whether you have uploaded the images yourself or are using SVGs, seeing the error message may leave you wondering what to do next. In this situation, you can take any of the following steps:
- Log out and log back in again
- Clear your browser history
- Use a different browser
To identify the best solution, it’s a good idea to try out each of these strategies and see which one works for you. If you aren’t sure how these methods will play out when you try them on your computer, here is what you can expect from each one.
3 Key Strategies
1. Logging Out/Logging In
In some cases, the solution for eliminating the Cricut remove exclusive content error is as simple as logging out of your account and logging back in again. This strategy mimics the most basic solution for a malfunctioning computer or other device. When in doubt, it’s often best to simply start all over again and give the system a chance to refresh itself.
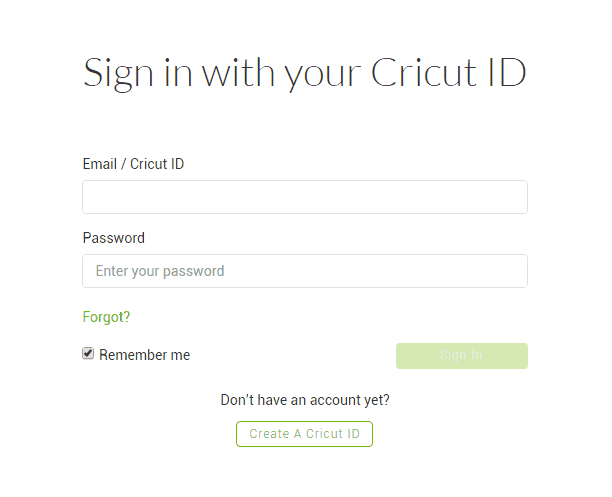
To log out in Cricut, simply open the menu on the top left corner of the screen. You should see a “sign out” button all the way at the bottom of the menu. Click on that button and let the system log you out. Next, log back in and return to your design.
In most cases, this fast and easy method erases the “remove exclusive content” error for good. You can now return to working on your design without any distractions.
Free Gift: 5 Premium T-shirt designs from Tee.design
2. Clearing Your Browser History
While logging out is often an effective solution, it isn’t completely foolproof. If you still see the Cricut remove exclusive content error plastered on your screen, don’t give up just yet. You can still try out this alternative strategy to save your account.
Now, it’s time to clear your browser history. To ensure that this method works, you should also delete all of your browser’s cookies and cache. By doing this, you can erase your browser’s memory and start on a clean slate the next time you log into Cricut.
This usually allows the browser to forget that it gave you the error message, which makes it possible for you to successfully access your uploaded images.
The steps you have to take to clear your browser history depend on the type of browser you have. You can look up your specific browser to determine how you can clear all of your history, cookies and cache. Once you’ve successfully erased all this information, you can log back in and return to selecting images and fonts.
Next, wait to see if the Cricut remove exclusive content message still appears.

3. Using a Different Browser
If all else fails, try opening up Cricut in a completely different browser. This method often works if there was a problem with the browser you used previously. In general, Google Chrome and Mozilla Firefox are the preferred browsers for Cricut, as they are most compatible with the site.
If you weren’t initially using either of these browsers, try using both of them to see which works for you. Likewise, switch to Chrome if you were using Firefox and vice versa.
If the first two strategies didn’t work for you, switching browsers should solve the Cricut remove exclusive content problem for good. It’s also worth noting that your new browser may require you to install the corresponding plugin for Cricut Design Space. Once you have everything set up, you can resume working on your project error-free.
Cricut Access
If you aren’t experiencing issues while using uploaded images, you are likely seeing the error message while using Cricut Access. In this case, the problem is that your subscription to Cricut Access has expired. This means that you no longer have permission to use images and fonts that are reserved for subscribers of Cricut Access.
You have two different options to choose from in this situation, and what you decide depends on what you wish to get out of your Cricut experience.
- Renew your subscription to Cricut Access: This is the most straightforward way to regain access to exclusive fonts and images. All you need to do is sign up for an additional month or year of access to browse all of the media you like without any error messages.
- Remove subscription-only images and fonts: If you aren’t willing to renew your subscription, you’ll need to get rid of any images or fonts that are reserved for subscribers. Simply identify the items that are available for subscribers only and remove them from your library. Now, you can enjoy the pictures and fonts that are available without a subscription.
Cricut offers plenty of ways to enhance any kind of project you’re working on. By making use of these strategies, you can fix the Cricut remove exclusive content error and achieve your design goals stress-free.