More and more people are discovering the benefits of owning a heat press. Heat presses are a quick and easy way to transfer graphics onto a range of materials for both home and commercial use.
There are many heat presses on the market, but as with all things, some are better than others. While the basic process involved in how to use a heat press remains the same, some are more suitable for beginners to use, some are better for domestic use and some are a better choice for commercial businesses.
Before you purchase one, it can be very useful to find out just what they are, how they work, what else you need to use one and exactly what they can be used for. In this guide we hope to cover everything you need to know to purchase the best heat press for your needs as well as answer any questions you may have.
If you have never used a heat press before it can be very daunting working with such high temperatures. All heat presses should come with guidelines, so always follow these and take your time to make sure that everything is set up properly before you start. You will soon be able to create T-shirts, household linen, sweatshirts and sports shirts, caps, make up bags and so much more.
Whether you’re looking to create your own designs for use around the home or make items to sell on, by the end of this guide you should know all you need to know to get you started and some helpful heat press reviews to help you find the right one.
Let’s begin by finding out exactly what a press is and what it does.

How Does A Heat Press Work?
A heat press works in the same way as ironing a transfer onto a T-shirt, except it is more efficient and will give better results. When you use an iron you have to apply your own force and this can not only be tiring, but you won’t apply even pressure all over your transfer.
A heat press has two plates, one of which is heated and one is not. The fabric and the transfer paper are then placed between the two plates and these are pressed together with a lot of force and at a high temperature.
The ink from the transfer paper is then transposed onto the fabric, creating your image just where you want it. The big advantage of a heat press is that it exerts the same force equally over the whole transfer and you don’t have to exert any force yourself.
Heat presses simply need to be placed near an electric socket for them to work and require very little setting up. It is also a cheaper option than screen printing.
What Can You Do With A Heat Press?
There is almost no limit to what you can create with your own imagination and a heat press. While the process will work better with materials that can handle high temperatures, as you become more experienced, you may find you can start to experiment with other materials as well.
One of the main uses of a heat press is to create T-shirts. Once you have created a design you can use your press on other clothing as well. If you are a member of a local sports team you can use your heat press to create logoed sweatshirts, tracksuits, sports shirts and caps.
You can also create your own line in fashion wear by printing on T-shirts, jackets and jeans or you can create your own line of baby clothes.
More commercial applications can be company mouse mats, marketing key fobs, cell phone cases and even ceramics. You can transform your own household linen such as tea towels, cushion covers, pillow cases and sheets or create your own lines to sell on.
For hobbyists who like to sell their products at craft shows a heat press can also be used to make bags, purses, tote bags and place mats.
Mugs with designs on are very popular and to create these you will need a mug attachment or a special mug press. While a mug press is a different shape it does work in the same way as a normal heat press.
As long as the material you want to use is compatible with a heat press, then you can let your imagination run wild to create your own personalised items.
Free Download: 5 premium T-shirt designs from Tee.design
Things To KnFree Download: 5 premium T-shirt designs from Tee.design
ow Before You Start
Although heat presses can be quite heavy, it is possible to move them but it might be a better idea to have an area set up before you bring it home. All you need is a room with an electrical socket, a window, and a sturdy area to put the heat press onto.
Because of the temperatures reached, it is a good idea not to have anything else plugged into the socket as the press can draw a lot of energy. For safety’s sake you should also never leave children unattended in a room with a heat press.
As with all things, particularly when you are first starting out, it may be best to purchase a new heat press in case of any problems. A second-hand or refurbished press may have uneven pressure, or may develop problems which an inexperienced user may not notice.
You should also check to see which heat presses are available to buy, and what they all do. Some heat presses will come with free items included, such as heat transfer paper or a Teflon coated sheet, and these can be a good way to practice to make sure you understand the process before you try it for real.
Before we look at some heat press reviews, let’s first look at the different types available to you.
Choosing The Right Heat Press For You
Heat presses come in three main types: clamshell, swing away and draw heat. The only real difference is the way in which they open and close. The type you choose is often down to personal preference, but the amount of space you have available may also be an issue as well.
Clamshell Heat Press
The clamshell or top opening heat press is so-called due to its shape. It has a hinge on one side so that when it opens it resembles a clam. The heated platen is on top, and the material is placed onto the cooler lower plate. The top is then lowered and clicked in to place until the timer has run down.
This type of heat press takes a less room than either the swing away or the draw heat, so it can be a good choice for someone working from home or for someone who just wishes to press occasionally. It is also a good choice for a beginner who wants to get used to working with such high temperatures. The one main disadvantage with a clamshell heat press is that it may not press items such as tote bags evenly, due to the way it opens. It works better with thinner items such as T-shirts.
Swinger or Swing Away Heat Press
The swing away heat press takes up more room than a clamshell due to the fact that the upper plate swings away from the lower plate.
The main advantage of this is that it allows you to lay out your fabric on the plate with more room to work, but in doing so you do have to be more careful not to touch the upper plate while it is hot. As this heat press does not have a hinge to control the thickness it has more versatility as to the materials which can be used in it.
Draw Heat Press
A draw heat press operates very similarly to a swing away heat press, except it is the lower plate which pulls out or swings away.
The main advantage of this style press is that you can lay out your fabric away from the heated plate. You do, however, have to be more careful when replacing the lower plate so as to ensure that your fabric and transfer do not move.
Sublimation Heat Press
If you only intend to use your heat press for making T-shirts there is also the option of a sublimation heat press. While all heat presses will transfer onto a T-shirt efficiently and the logo will stay on, a sublimation heat press uses a process which allows you to create more intricate designs which will not bleed. All machines can be either manually operated or automatic, and all can be used at home or in the workplace.
To help you work out which is the best heat press for you, we’ve put together five heat press reviews for machines which we think offer excellent value for money, and which will suit both beginners and experienced pressers.
Free Download: 5 premium T-shirt designs from Tee.design
Our Top 5 Best Heat Press Machine Reviews
1. PowerPress Hpm-1515-BK Industrial-Quality Digital Sublimation T-Shirt Heat Press Machine, 15″x15″, Black


Features:
- Heat plate 15 inches x 15 inches
- Overheat protection
- Teflon-coated heating plate
- LCD control
- Temperature range: 0°F to 750°F
- Time rage: 0 to 999 seconds
The PowerPress Hpm-1515-BK Industrial-Quality Digital Sublimation T-Shirt Heat Press Machine is a sublimation heat press, so it is an ideal choice for anyone looking to set up a T-shirt or clothing business.
The plate is 15” x 15” so it has plenty of room for laying out your fabrics and it comes with a very easy-to-use touch LED pad. The temperature can be either in Celsius or Fahrenheit and it even has a handy chart to convert to the correct temperature. The temperature goes up to 750°F giving you the option to work with a larger variety of fabrics and with a time of up to 999 seconds you have ultimate control over everything you press.
Should you need to adjust the pressure there is a large control knob on the top of the press which you just twist to increase or decrease it.
To help you keep the plate clean, the heating plate is Teflon-coated so that you can easily wipe off any excess ink. It is also far less likely to damage your fabric and it gives an even temperature all over. Although you set the time and temperature it still has protection from overheating and in the case of an electrical short.
This heat press is easy to set up so that any beginner can get started quickly and easily, but it also perfect for experienced pressers, check out the latest price here (amazon link).
2. Fancierstudio Power Heat press Digital Heat Press 15 x 15 Sublimation Heat Press Rhinestone Heat Press T-Shirt Heat Press 15×15 B/BLK

Features:
- Heat plate 15 inches x 15 inches
- Teflon sheet included
- Pressure adjustable
- Temperature range: 0°F to 699°F
- Time rage: 0 to 999 seconds
- Silicon gel base board
The Fancierstudio Power Heat Press is a clamshell type model which has a compact design to help you save space, so it is perfect for home use. It comes with a Teflon coated sheet to help protect the heated platen and the rubber base is made using silicon gel to protect it from knocks and the high temperatures.
The heat press is an LCD display with very easy to see controls, which can be set precisely for both the time and temperature. The temperature goes up to 699°F meaning you can use it for a variety of fabrics and with a timer going up to 999 seconds you can create the perfect item every time, as you have total control over what you do. A knob in the middle helps to control the pressure if you want to work with thicker items, and the press even has a handy guide to convert Fahrenheit to Celsius on one side of it.
The 15 x 15” heated platen is not only coated but it also comes with a free sheet to help protect it from any damage. The lower pad is made from silicon gel help give it added strength, and this is firmly glued in place to protect it from wear and damage. It is a clamshell design meaning that thick items may not press so well, but it can still be used for a large number of items including T-shirts and other clothing, mouse mats, jigsaw puzzles, ID badges, tiles and household linen too.
This is a good starter heat press as it can be set up and used straight from the box, but is also suits experienced heat press users just as well. If you want to see more reviews, see what other users think (amazon link).
3. Cricut Easy Press

Features:
- Heat plate 9 x 9 inches
- Auto shut off
- Iron on in 60 seconds or less
- Safety base
- Temperature range: 0°F to 350 °F
- Reference chart for time and temperature settings
The Cricut Easy Press is lightweight, portable and very easy-to-use. With a 9 x 9” heating plate, it is just the right size for T-shirts and its size and portability make it the perfect option for a small craft business, where you may wish to print on site.
The easy press requires you to press down onto the fabric yourself, and it has a large handle to help distribute the heat evenly. There is an easy to read, easy to set gauge on top of the press so that you can accurately set both time and temperature. In most cases the transfer is set in less than 60 seconds.
Although this requires you to push down yourself, the transfer will look just as professional and last just as long as any other type of the press. It comes with a safety base to lay your T-shirts onto and to protect the work surface from the heat.
Included in the pack are some materials so that you can practice before you attempt your own designs. This press can either be used instead of a larger press or it can be used to complement another heat press, as it gives the versatility to use it on site where other presses are too heavy.
This is an excellent heat press for a beginner or hobbyist as it can be tucked out of the way when not in use. For the more experienced users, it’s an excellent press to add more options to your business as you can create more when you are away from home.
4. ePhoto New Digital 15″ x 15″ T-Shirt Heat Transfer Press Sublimation Heat Press Machine 1515GB

Features:
- Heat plate 15 inches x 15 inches
- Teflon coated heat platen
- Adjustable pressure
- Digital temperature and time controller
- Large LCD display
- Temperature range: 0°F to 500 °F
- Time rage: 0 to 999 seconds
This ePhotoinc Heat Press is ready to use straight from the box, making it a good choice for anyone new to using a press.
The 15 x 15” heated platen is Teflon-coated to protect it, and make it easier to clean off any excess ink. The heat press has an easy to see LED display for both time and temperature, with a very easy-to-use controller so you can set the press precisely how you want it. The temperature goes up to 500°F providing you with a large choice of materials to work with, and although it works best on T-shirts it can also be used to make other garments, bags, mouse mats, household linen, tiles and plates.
The pressure can be controlled if needed and to help with safety, the heat press will beep when the required time has run down. The design is a clamshell which has a sturdy handle to hold the two plates together when in use, and it also comes with a handy temperature guide for converting Celsius to Fahrenheit and vice versa.
This is a versatile heat press which is a good choice for both beginners and experienced users.
5. Fancierstudio DG HEAT PRESS Digital Sublimation T-Shirt Heat Press,15-by-15-Inch – Black

Features:
- Heat plate 15 inches x 15 inches
- Teflon sheet included
- Silicon gel base board
- Adjustable pressure
- Digital temperature and time controller
- Large LCD display
- Temperature range: 0°F to 500 °F
- Time rage: 0 to 999 seconds
The Fancierstudio DG Heat Press is a sublimation heat press so a good choice for anyone who wants to create T-shirts. The 15 x 15” plates are large enough to handle most designs, and with touch control temperature and time you can use most fabrics and materials. The clamshell design comes with adjustable pressure to help you use different widths of material as you can create even pressure all over.
It comes with a Teflon coated sheet to protect the heated platen and make it easier to keep clean. The base pad is made from silicon so it is longer lasting, and this is only very lightly glued down to hold it in place but also makes it easier to remove it when it needs to be replaced.
This is a good heat press for both domestic and commercial use and is a great way to make not only T-shirts but other clothing, bags, mouse mats, jigsaw puzzles, ID badges, ceramic tiles and so much more.
It requires minimal setup so once it’s plugged in you can get started on your new projects straightaway. An excellent choice for beginners and for experienced users alike.
So, Why Buy A Heat Press?
There are so many advantages to using a heat press, whether you use it for single items for the home or commercially.
Easy to use.
Once you’ve got it home, there’s minimal setting up to do and you can get straight to work. There is no need to wait for anyone to install it or for electricians to wire it in. The operation of a heat press itself is pretty simple too. Just set the time and temperature and pull the handle. The manuals even tell you how long you need so you don’t have to work it all out for yourself.
Cost effective
One huge advantage of a heat press is the cost to get started. The biggest outlay you have to make is for the press itself and there are models available to suit all budgets. Some of the things you need to use with the press are things you’re likely to already have, such as a computer and printer and you don’t have to invest in special inks either – the ones from your inkjet printer will do just fine.
High quality images
The heat press will reproduce whatever you print, so the images are always high quality and they produce the same, vibrant colors as the ones on your graphic. As long as your printer produces high quality images, and most printers do, then this is a very cheap way to create an item with a graphic which will really stand out.
Quick and easy
Unlike screen printing, a heat press produces high quality items very quickly. Once the press is heated it can be used for numerous items until you have finished work. You don’t have to wait for anything to dry or seal before you can start work – just print your graphics and go.
Produces a large range of items
One of the biggest advantages of a heat press is the number of different items you can make and the materials you can work with. It makes it an excellent machine for any small or large business as you can continually add to and improve the range of products which you offer. At home you will find you will start with something simple such as a T-shirt, but it won’t be long before you start creating your own designs for your own household linen.
It can be used with most fabrics, except for more delicate fabrics such as silks and certain plastics, and can be used for clothing, tea towels and bed linen, tablecloths and cushion covers, make up bags, purses and tote bags, caps, tiles, plates and just about any surface which is capable of accepting the transfer. With the right press or attachments you can even create your own range of mugs.
Small and efficient
Unlike other machines, such as screen printing, a heat press doesn’t take up too much room. This is a huge advantage not just for the home but also for a business, as it allows you to potentially use your space for other machines and equipment as well to help you create other wonderful projects.
Manual Or Automatic: It’s Your Call!
Another advantage of a heat press is that you can choose the mode of operation. You can choose to have a manually operated machine, which allows you total control, or you can have an automatic machine which is excellent choice for a beginner.
Manually controlled heat presses are more suitable for those who have experience with using the machines. They allow you to adjust the time, temperature and pressure to any setting you wish so they are perfect for experimenting with different fabrics and materials. The big disadvantage for a new user, is that this type of heat press can prove to be very confusing and can also lead to some very costly mistakes.
Automatic machines still allow you to set the precise time and temperature required. They usually control the pressure for you but some automatic heat presses will also have a pressure control knob in case you choose to use thick fabrics.
In most cases the heat press comes with a guide to help you choose the time and temperature so the only big difference between manual and automatic is how much you want to experiment with different fabrics and products.
Size
There isn’t really very much choice when it comes to size of the plates. Whether you choose a larger or smaller plate will really depend on what you are hoping to produce and the size of images you want to create. For example, for most T-shirts a standard 15” x 15” press is usually more than adequate, and this is usually good for most other items too.
If you’re planning to print on larger items such as sheets or create larger graphics then you may need to look at the larger size of plate.
Getting Started
Now that you have the best heat press and you know what you plan to press, you can finally get started.
You should have a good idea of where you want to place your heat press so that when you get it home all you have to do is put it down and plug in. While the machines themselves aren’t that big, they can be quite heavy so it’s a good idea to think carefully about where it’s going to go before you purchase it.
Depending on your type of machine allow plenty of room to work around it and remember that it will get very hot, so placing it near a window can be a very good idea. You will need an electric socket to plug it in and a study surface to place it on.
While the press is heating you can use that time to print and organise your transfers and fabrics. If you have a flat workbench it gives you the opportunity to lay everything out so that once the heat press is heated you can just get to work. It also gives you the opportunity to properly line up exactly where on the fabric you want your graphic to go.
Let’s take each step one at a time to find out exactly how you go about creating your finished product.
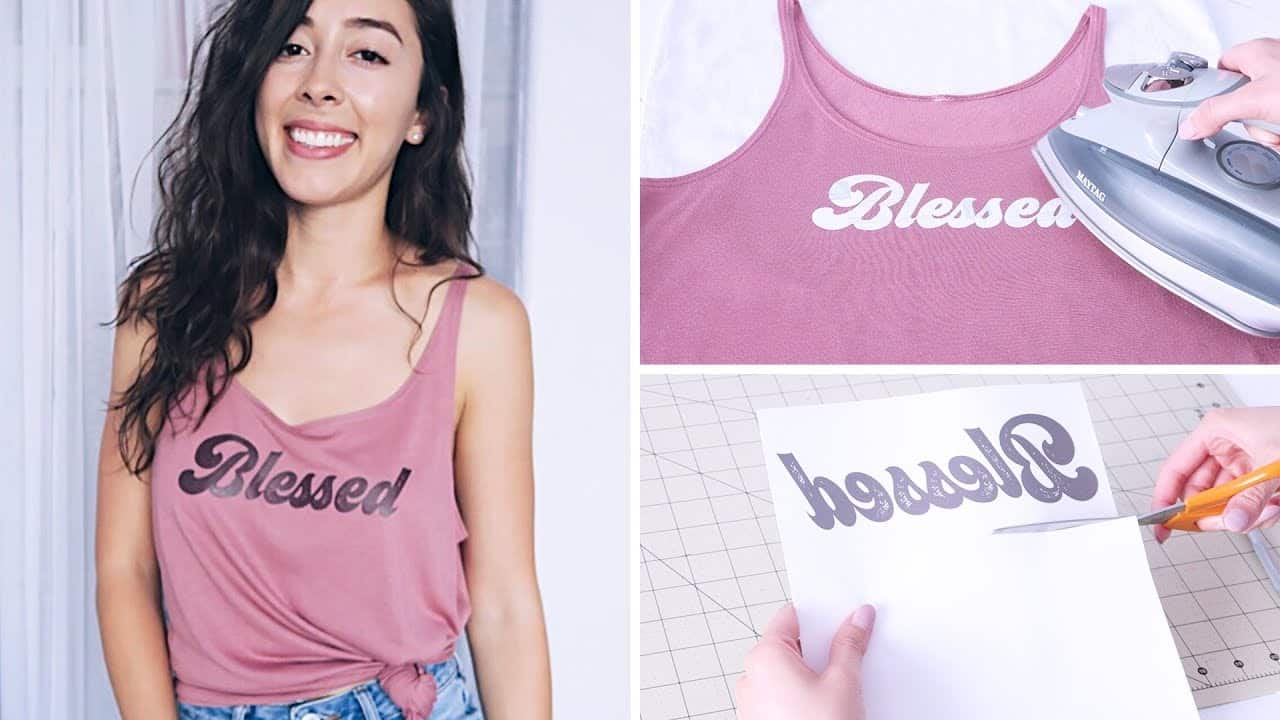
- First of all you need to sort out the image you intend to use. This can be done on a computer or tablet using graphics software such as Photoshop or CorelDRAW, or you can draw your image and then scan it in. When you are happy with the finished result, you need to print it out using special heat transfer paper. There are different types of paper so always check the temperature you need and that the paper will work on the fabric you intend to use. When you go to print, always use reverse image or mirror image as you will need to print it out back to front. The printed image goes facedown onto the fabric.
- Once you’ve printed it off its best to trim it down to size. Remember, that the heat press will transfer all of the transfer paper onto your fabric even if it has not been printed on. If you do not cut your image down you will simply get unwanted film transferred onto your fabric. When it comes to choosing your transfer sheets you may find that you prefer certain types to others, but on the whole if you are printing onto white fabric it is better to use a clear transfer sheet. If you’re using colored fabrics then opaque transfer sheets work best.
- Any fabric or material that you use your heat press with should be thoroughly cleaned before you start to press. If it’s a fabric, wash and iron it to remove any dirt or creases or if you’re printing onto other materials wipe them down and dry them properly so they are grease free. This gives you a better surface for the transfer paper to create a cleaner solid image.
- The next step is to get your heat press ready for the transfer. Making sure it is plugged in, turn it on. Using your temperature guidelines, find the fabric you’re using and set the thermostat to the right temperature. Your heat press will have instructions telling you how to do this, but on most models this simply involves turning a dial or pushing a button. When it has reached your desired temperature, it will let you know. Some models will beep to notify you, while some models make use of a red light.
- When the temperature is ready, open your heat press carefully and if you have a swing out model, swing the plates out. Taking great care not to touch the heated plate, lay your fabric flat onto the bottom plate and place your heat transfer paper face down on the fabric where you want your graphic to be.
- Then set the timer according to the guidelines and swing the plate back in or pull the top plate down. Click the handle into place and the timer will start a countdown. The heat press will most likely beep to let you know when the time has elapsed and that your image should now be firmly in place.
- Pull the handle to open the plates and carefully remove the fabric from it. Using your workbench carefully peel the transfer paper on the fabric to reveal your finished graphic. The paper should come away cleanly with little effort leaving all the ink on the fabric. If you are printing T-shirts or any other fabric allow the transfer 24 hours to settle before you wash it.
You may find that your first few attempts don’t work quite as they ought to, but the more you practice the better you will get.
Maintaining Your Heat Press Machine
One great thing about a heat press is that it really does need very little maintenance. That doesn’t mean that you don’t ever need to do anything to it, so here are a few tips.
Keep it clean
When you’re working with inks, it’s very easy for the plates to get dirty. If you wipe any ink off as it appears you will save yourself a lot of work later on. Always wait until the plates are cool before attempting to clean them and if you find that simple hot water isn’t doing the job, then you can wipe them gently with mineral spirits on a soft cloth. Never scrape the ink off or this will damage the plates.
You can get Teflon coated sheets to use in the heat press and these go between the transfer paper and the upper plate. These are designed to protect the plates, so if there is any excess ink it will go onto the sheet and not directly onto the plate.
Look after the silicon pad
At the bottom of the heat press you will find a silicon or rubber pad. This can become damaged over time by objects such as zips or simply general wear and tear from loading and unloading fabrics. If this pad is damaged it can affect the overall pressure at the edge of your fabric. One very simple way to protect this pad is to use a Teflon cover. This protects the pad and also makes it much easier to place your fabrics in the press.
Keep it oiled
As with all machinery the heat press has moving parts which all need to be kept in good working order. The hinges, and swivel joints, and any other parts which move all need to be greased to keep them in good working order. The last thing you want is to have hinges which seize up because they have dried out. Simply check your machine once a month, depending on how often you use it, and oil all the pivot points and joints to keep them moving freely.
Tips:
- Set your press up in a room with good ventilation, or invest in a good fan. It will get hot when you work.
- Always wash your fabric or clean your item before you press.
- After pressing, do not wash your item for 24 hours. This allows the ink to lock properly in to the fabric.
- When printing your transfer, use an ink jet printer as these will produce a clearer image.
- Teflon sheets can help to protect the platen and the fabric and will keep the heat press clean.
- To test if your press is applying even pressure: Place 4 pieces of card, one in each corner and close the press. If one piece of card can be removed easier than any others, then that area of your press is applying less pressure.
- If printing on bags, or anything else with a zipper, make sure the actual zipper is hanging out side when you come to press. You may melt the tag or else it can affect the quality of your print.
FAQs
What can I make with a heat press?
As long as you use the right fabric and the right heat transfer paper, you can let your imagination loose by creating a large variety of projects for home use or to sell on.
While heat presses are mainly used for t-shirts, you can also add logos to sweatshirts, tank tops, sports shirts, caps, baby clothes and just about any other item of clothing. You can create your own designs for household linen, including tea towels, cushion covers, pillow cases, duvet covers, place mats and tablecloths. You can even make your own aprons and oven gloves.
With practice, you can create purses, tote bags, and make up bags, or expand out to mouse mats, key chains, cell phone covers and even plates.
The list is almost endless, as long as you check that the materials you want to use can withstand high temperatures.
How long does it take?
Heat presses can be a very quick way of producing a number of items. Once it is up to temperature you can keep on printing as long as you want to. Depending on your chosen temperature it can take anything from 5 to 15 minutes to heat up. When it is ready, the time it takes to press your items depends very largely on the fabric you are using, but in most cases it simply takes a matter of seconds to transfer your image onto the fabric.
Can you work with any fabric?
Within reason, yes. Before you start work, first check the guide you received when you purchased your heat press. It will give the correct temperature for all fabrics, and advise you if you cannot use certain materials. The best fabrics to work with are cotton, nylon, polyester, Lycra, and Spandex.
If you do want to use a material which will not handle a high temperature, such as plastic, or silk, practice at lower temperatures and you will need a transfer which will work at lower temperatures as well.
How hot does a heat press get?
Heat presses, by their very nature, are designed to be used with high temperatures.
Not all heat presses have the same temperature range so it’s important to get the right press if you intend to work at higher temperatures. Temperatures start at 0°F and can go as high as 750°F. Some people are understandably wary about working at such high temperatures, but as long as guidelines are followed and you consider your own safety, heat presses are very safe machines to work with.
It’s important to always use the guidelines included with your heat press for each type of fabric you use. If in doubt, use a small piece of fabric as a test piece before you start. If you work at a temperature which is too low, you will find that your transfer does not stick properly. If you work at the temperature which is too high, you could damage the transfer and the fabric or even burn it.
You must also allow adequate time for the heat press to reach the desired temperature. Depending on your choice of heat press this can be anything up to 15 minutes.
Can you heat press on to mugs?
You can use a heat press to press designs onto mugs but you will need a specialist mug heat press. A normal heat press won’t work as it cannot be adapted to hold something circular in design.
Is it easy to set up a heat press?
Yes, it is. Before you purchase it, set up a space for it. You will need it close to an electric socket so you can plug it in without tripping over the cable. Depending on your choice of heat press, you will need to allow space on either side to swing the platen out, as well as room for you to move around it. It will need to be placed on a firm, flat surface such as a solid desk, and you will need a room with ventilation or you will get very hot while working. If there is no window or just a small one, purchase a fan – you’ll need it.
When you get your press, you just need to unpack it, place it where you want it, and plug it in.
Is it hard to operate a heat press?
The good news is that most heat presses use the same method of operation, and this makes it easy for a beginner to start practicing.
Presses have three controls: temperature, time and pressure. Most heat presses are automatic so you do not have to time them manually and they will just switch off once the time has elapsed.
Heat presses that have an LED display make it easy for you to see when you are programming it. The heat should be set to the temperature as per the guidelines for the fabric you are using. You will find it takes a few minutes for the press to reach the desired temperature, and when it does it will notify you as per the press instructions. This can be with a beep, a red light coming on or a red light going off. Once the temperature has been reached the thermostat will start to work and it will stay at that temperature as long as you continue to work.
The time should be set, again as per your heat-press guidelines. This can be a simple up or down control of an LED display or a knob that you turn. When you start to press the time will start to countdown and when the time has elapsed the press will notify you that your item is ready. Some heat presses will release the handle automatically when the time has counted down.
The only other control you may need to operate is the pressure control. This controls how much pressure the plates put onto the item inside. In most cases this does not need adjusting, but if you are pressing onto something slightly thicker you may need to alter this. As you get more experienced and you start to experiment you may use the pressure control slightly more.
At first it can be very daunting working at high temperatures but the more you use your heat press more you will realize that these temperatures get you the very best results.
Can you move your heat press?
Depending on what you use your heat press for, you may need something which has a portable design. Some heat presses can be very heavy and these are best set up and left in one place. Some smaller businesses may wish to take their press to business events and craft fairs so that they can produce their designs on site. If you think you will want to take your heat press out with you, check before you purchase it that it is light enough and small enough to be carried.
What else do you need?
You will need a few extras to be able to use your heat press.
Take the time to find the best heat transfer paper for your projects. Some suppliers may offer samples so it’s worth asking around. You will also need a computer and printer. As these are only used for designing and printing your image, you don’t need a high specification. You will also need image editing software such as PhotoShop or CorelDraw.
Ideally, you will need a place to set your heat press up without having to move it and a workbench or desk will come in very handy for laying out your designs to check them before you press.
If you are looking to sell your designs, then you will also need packing materials and paper to print your invoices on.
How do you create an image?
You don’t have to be an artist or even be able to draw to create an original design for your projects. All you need is some graphics software and your imagination. It doesn’t matter what graphics format you save your file as, as you will simply be sending it to your own printer once it is complete.
You can also draw an image and scan it into your software so that you can tidy it up or finish it off prior to printing. If you’re not sure which options you will require in the software you purchase, there are free graphics packages available so that you can practice before you spend any money.
When you are happy with your graphic it may be a good idea to first print it out on a blank piece of paper so that you can check that it looks how you want it to. When you’re happy with your image print it out onto your heat transfer paper, making sure that you use a reverse image or your graphic will appear on your item back to front once it is pressed.
How do you transfer an image to the fabric?
Transferring your image is a simple process, but you may need to practice it first.
Check the information which came with your heat-press, choose the correct temperature, and turn it on. While it is heating up you can quickly press your item and check that the graphic will sit where you want it to.
When the press is ready, open it up and lay your item on top of the lower plate. Make sure it is flat and there are no creases or your image will not appear correctly. Then lay your transfer paper onto your material making sure it is lined up exactly where you want it.
Then select the time as per the instructions, and close the press. The handle should click to hold the plates firmly together and it will notify you when the time has elapsed. If you are new to pressing, open the press carefully and gently lift the transfer paper from the fabric. It should come away easily and cleanly. If it starts to pull, then the image has not transferred properly, so close the press and give it a bit longer. If you follow the guidelines included with your heat press and the heat transfer paper you should find that your images transfer perfectly.
Can heat presses produce high volumes?
The best heat press can produce one t-shirt or 100, but you must remember that you do need to allow the time to press each one properly. If you are planning on pressing in volume, keep a rack handy to hang your items on so you can hang them while you press the others. This helps them cool and will start the process of locking the ink in place.
It goes without saying, that if you plan on using your machine a lot, it’s worth paying that bit extra at the start to get a press which is more for commercial use. Buying a cheaper one with the intention of replacing it may prove to be a false economy.
Is there a heat press just for t-shirts?
All heat presses will press onto t-shirts, but the best option is a sublimation heat press. While all heat presses will create very good t-shirts, a sublimation heat press is able to create higher quality and more intricate designs. They may have a larger area to work with as well, giving you more freedom with the size of image you can create.
What sort of budget do you need for a good heat press?
As with all things, the more you spend, the higher specification you will get. A good heat press can be purchased for a couple of hundred dollars or for more experienced, heavy commercial use you may be looking at four figures. If you’re just starting out and have a limited amount available, or you are looking to use it at home for a hobby, then most machines at the lower end of the market are more than suitable to get you started.
No matter what your budget, always check out the machine you are interested in and read any heat press reviews before you buy. Reviews are always very helpful at telling you some of the minor details which may not appear on the sales description.
Can I use the same press for a hobby and a business?
If you have bought your heat press to make items for your hobby or for the home, you can turn this into a business very easily using the same press. Most presses are designed to produce a high quantity of items, but if you intend to mass-produce on a regular basis you may want to consider upgrading to a better specification. For most purposes you will be able to use the same press for both domestic and commercial use.
Can anyone use a heat press?
Yes! Thanks to the way the heat press operates, and the way the controls are simple to use, anyone will be able to create stunning images using a press. It goes without saying, that it is not suitable for children unless they are strictly supervised, due to the temperatures involved, but for most people looking for an interesting hobby or for a new small business a heat press is the perfect place to start.